I recently got hold of a Hitachi MB H2 that wouldn’t work. Attaching a composite cable, I’d just see a black screen with some faint colored vertical bars. I probed around the computer with an oscilloscope and found that the computer actually appears to execute code in the first few microseconds or milliseconds after powering it on (or resetting). There didn’t appear to be any bad connections.
I saw some very pronounced unusual voltages on the data bus; judging by the color intensity on the oscilloscope screen I got 33% 0V, 33% about 1-2 V, 33% 5V. The 1-2 V bar could just be everything attached being in a “don’t care”/”high impedance” state, so I proceeded to look for some schematics on the internets. But there were none as far as I can tell! (Anyway, it seems normal to have some not-one-but-not-quite-zero-either activity on this computer as I found out later.)
Having no prior MSX experience, I proceeded to trace out a lot of the connections from the CPU to the other chips. It turned out that most data lines are directly connected to the CPU, implying that most of the chips should have some kind of “don’t care”/”high impedance” state. From the tracing I did I managed to create some partial schematics, until I found I was wise enough to figure some stuff out.
There is one thing that seemed very wrong to me on my MSX, I had no activity on the Z80’s IOREQ pin. I also never had activity on the VDP’s pins that interface with the CPU. So I set a rising edge trigger on the Z80’s IOREQ pin and pressed the reset button and saw that there were a couple very early IOREQ signals, suggesting that the computer works normally for at least a while.
A Z80 starts executing from address #0, and the code at this address will have to be on ROM. This machine has 32 KB + 16 KB of ROM, and 64 KB of RAM. A Z80 can only address 64 KB, so we will have to have some kind of mechanism to switch between ROM and RAM. I am not entirely sure how this works on the MSX, but to me it just seemed likely that the early boot code would perhaps copy the ROM contents to RAM and then execute code from there. And if the RAM is defective somehow we’ll be in a bit of a situation… (Even if that isn’t correct, broken RAM should/could/might cause things to go haywire early in the boot process.)
So I suspected the (non-socketed) 4164 RAM is probably broken (I think this is a very common defect for early computers), and set up a small circuit to help me test that theory.
RAM can break in a number of ways, some RAM chips get hot, some pull the data pin to 0 or perhaps 1, and some are perpetually high-impedance, i.e. they do not affect the voltage of the data pin at all. (None of the RAM chips were hot in my case. The video chip is very hot, but the datasheet mentioned something about 70 degrees Celsius so that’s probably fine.)
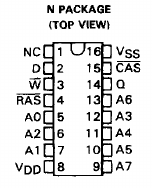
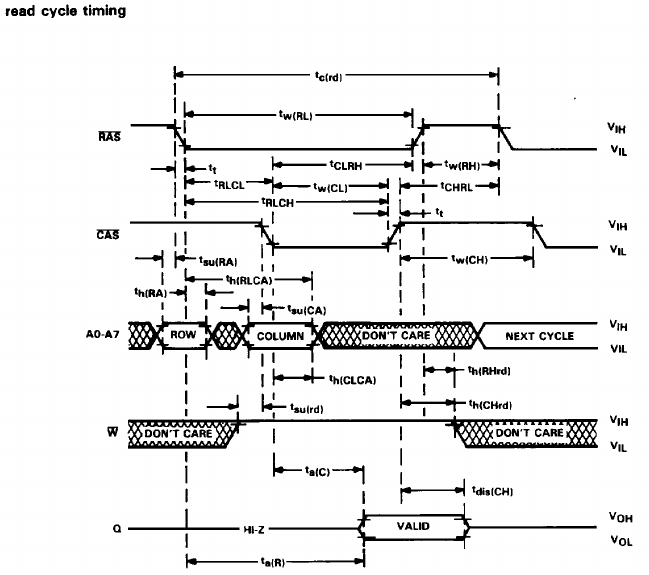
Unfortunately my oscilloscope only has two inputs. However, to verify if a RAM chip actually does something when somebody reads from it, we may need more, depending on the RAM chip in question of course. Here are some screenshots from the datasheet (TMS4164-datasheet-texas-instruments.pdf):
4164 pinout4164 read sequence
In the read sequence, we see that \CAS (usually high) is low and \W (usually “don’t care”) is high, and after a short moment we see either a low or a high on Q (normally “high impedance”).
So with just two oscilloscope inputs we don’t get very far, we’d need three (for \W, \CAS and Q). However, with a very simple circuit we can get by with two inputs.
All we need is a NOT gate and an AND gate. Then we can combine \W and \CAS and produce H if and only if (\W is high and \CAS is (not high)). So we wire things like this:
All you need is a breadboard, 74LS04 and a 74LS08 chip. Here’s a picture of the setup:
MB-H2 4164 RAM under test
So let’s have a look at the resulting oscilloscope captures to see if we can find anything interesting. In the captures, the output of the AND gate is in yellow, and the output Q (which is shorted to D on this computer) is blue. Maybe take a look and try to find the problem. The answer is right below the last image so, spoiler warning. ;)
D0D1D2D3D4D5D6D7
Highlight (and possibly copy and paste somewhere) the next paragraph to read the answer:
D0. Yellow goes high, but blue doesn’t budge at all. We’re trying to read from this chip but the chip isn’t outputting anything!
I piggy-backed (and made sure this particular problem went away) and replaced the suspect chip, but unfortunately it appears that that isn’t all that is wrong with this computer. :/ (If you see this text instead of a link to additional blog posts, that means that I haven’t figured out the problem yet, or haven’t gotten around to creating a write-up for it yet.)
In fact this may have been the only thing wrong with the computer. Piggy-backing unfortunately didn’t work, but after soldering things eventually worked out. I also replaced another RAM chip that seemed like it was misbehaving (More two-channel oscilloscope-based RAM testing) because I was already desoldering, so that could have been part of it too.
I recently got hold of a Spectrum ZX81 RAM pack that when plugged in, produced a garbled screen on boot. I decided to check what’s wrong before ordering any chips. To do that, I first looked at the schematics and made sure there were no bad connections. This was a laborious process, but fortunately all RAM chips share all pins except the data pins, so you should have continuity between all pins except two on all RAM chips.
I finally thought I found something broken — but it turned out that there’s just a slight difference between my board and the schematics: only three NAND gates are used on the quad NAND IC, and logically and electrically it doesn’t matter which gates you use and which one you leave unsoldered. Well, for some reason my board used different pins (i.e., left a different gate unsoldered) than the ones in the schematics.
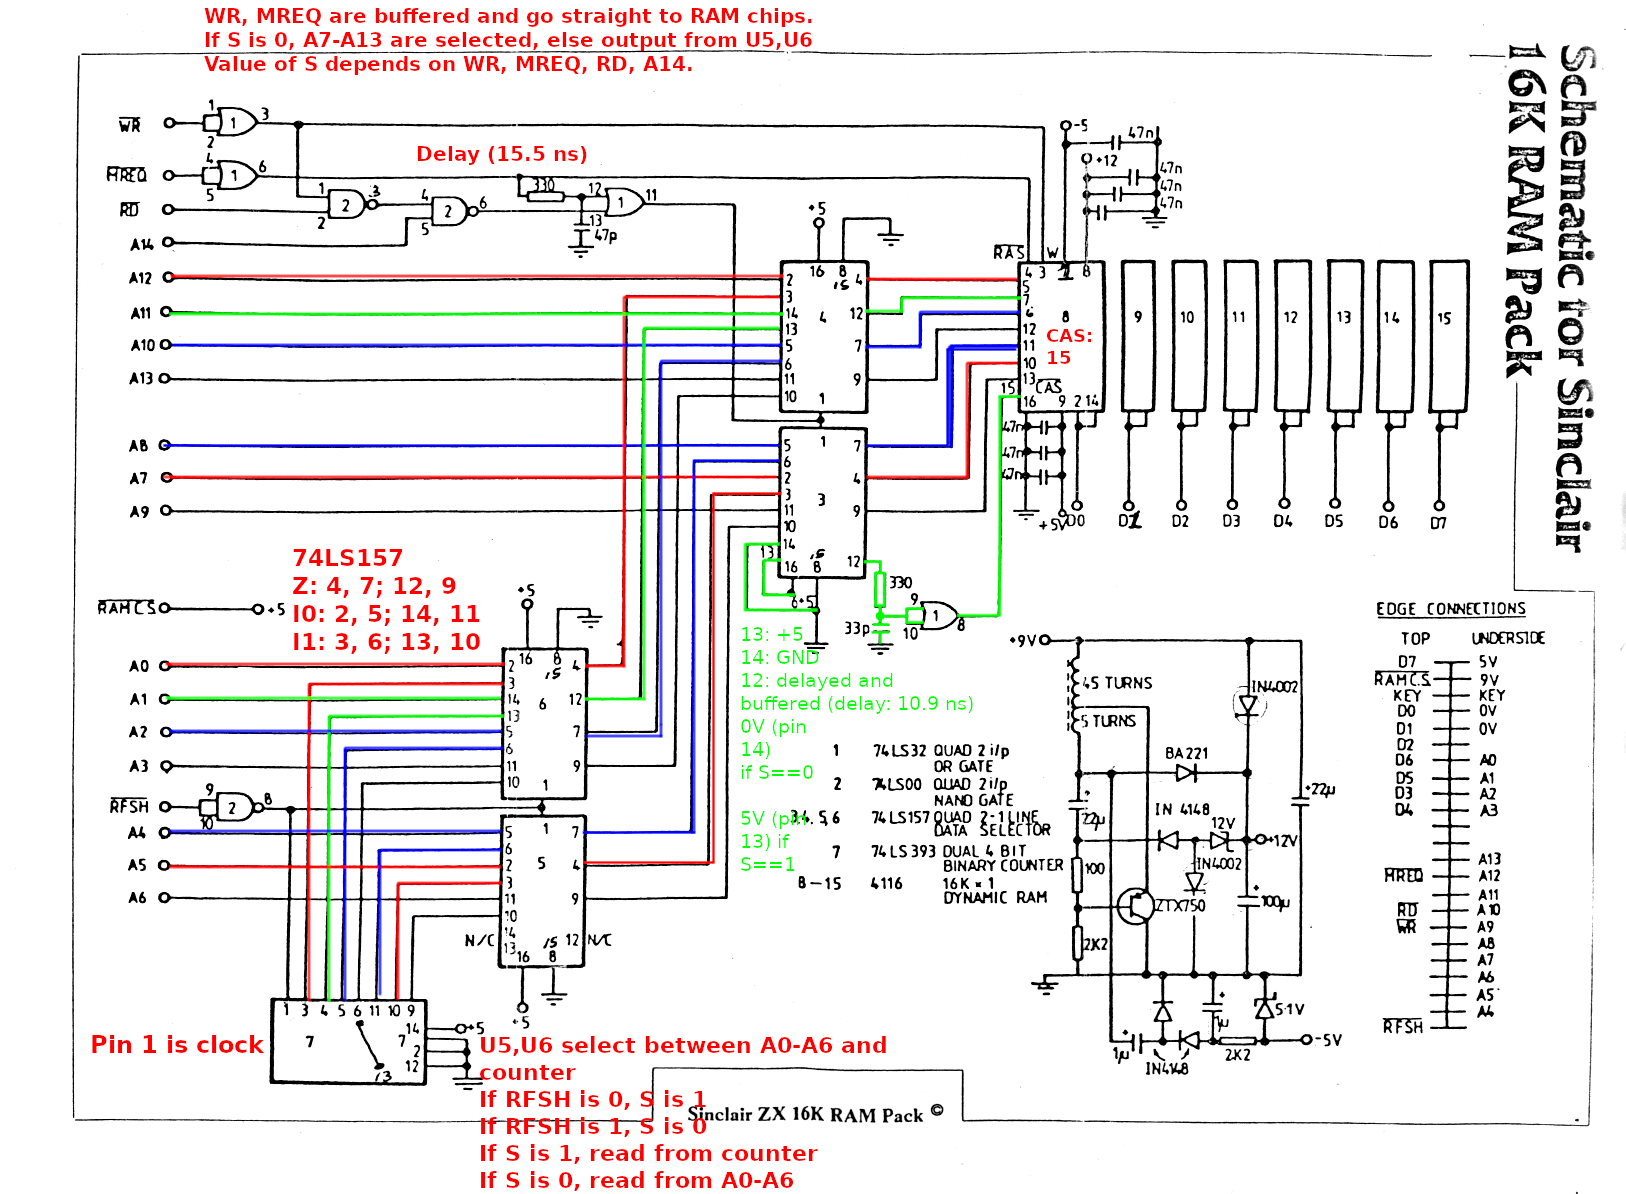
Below you will find my annotated schematics of the RAM pack.
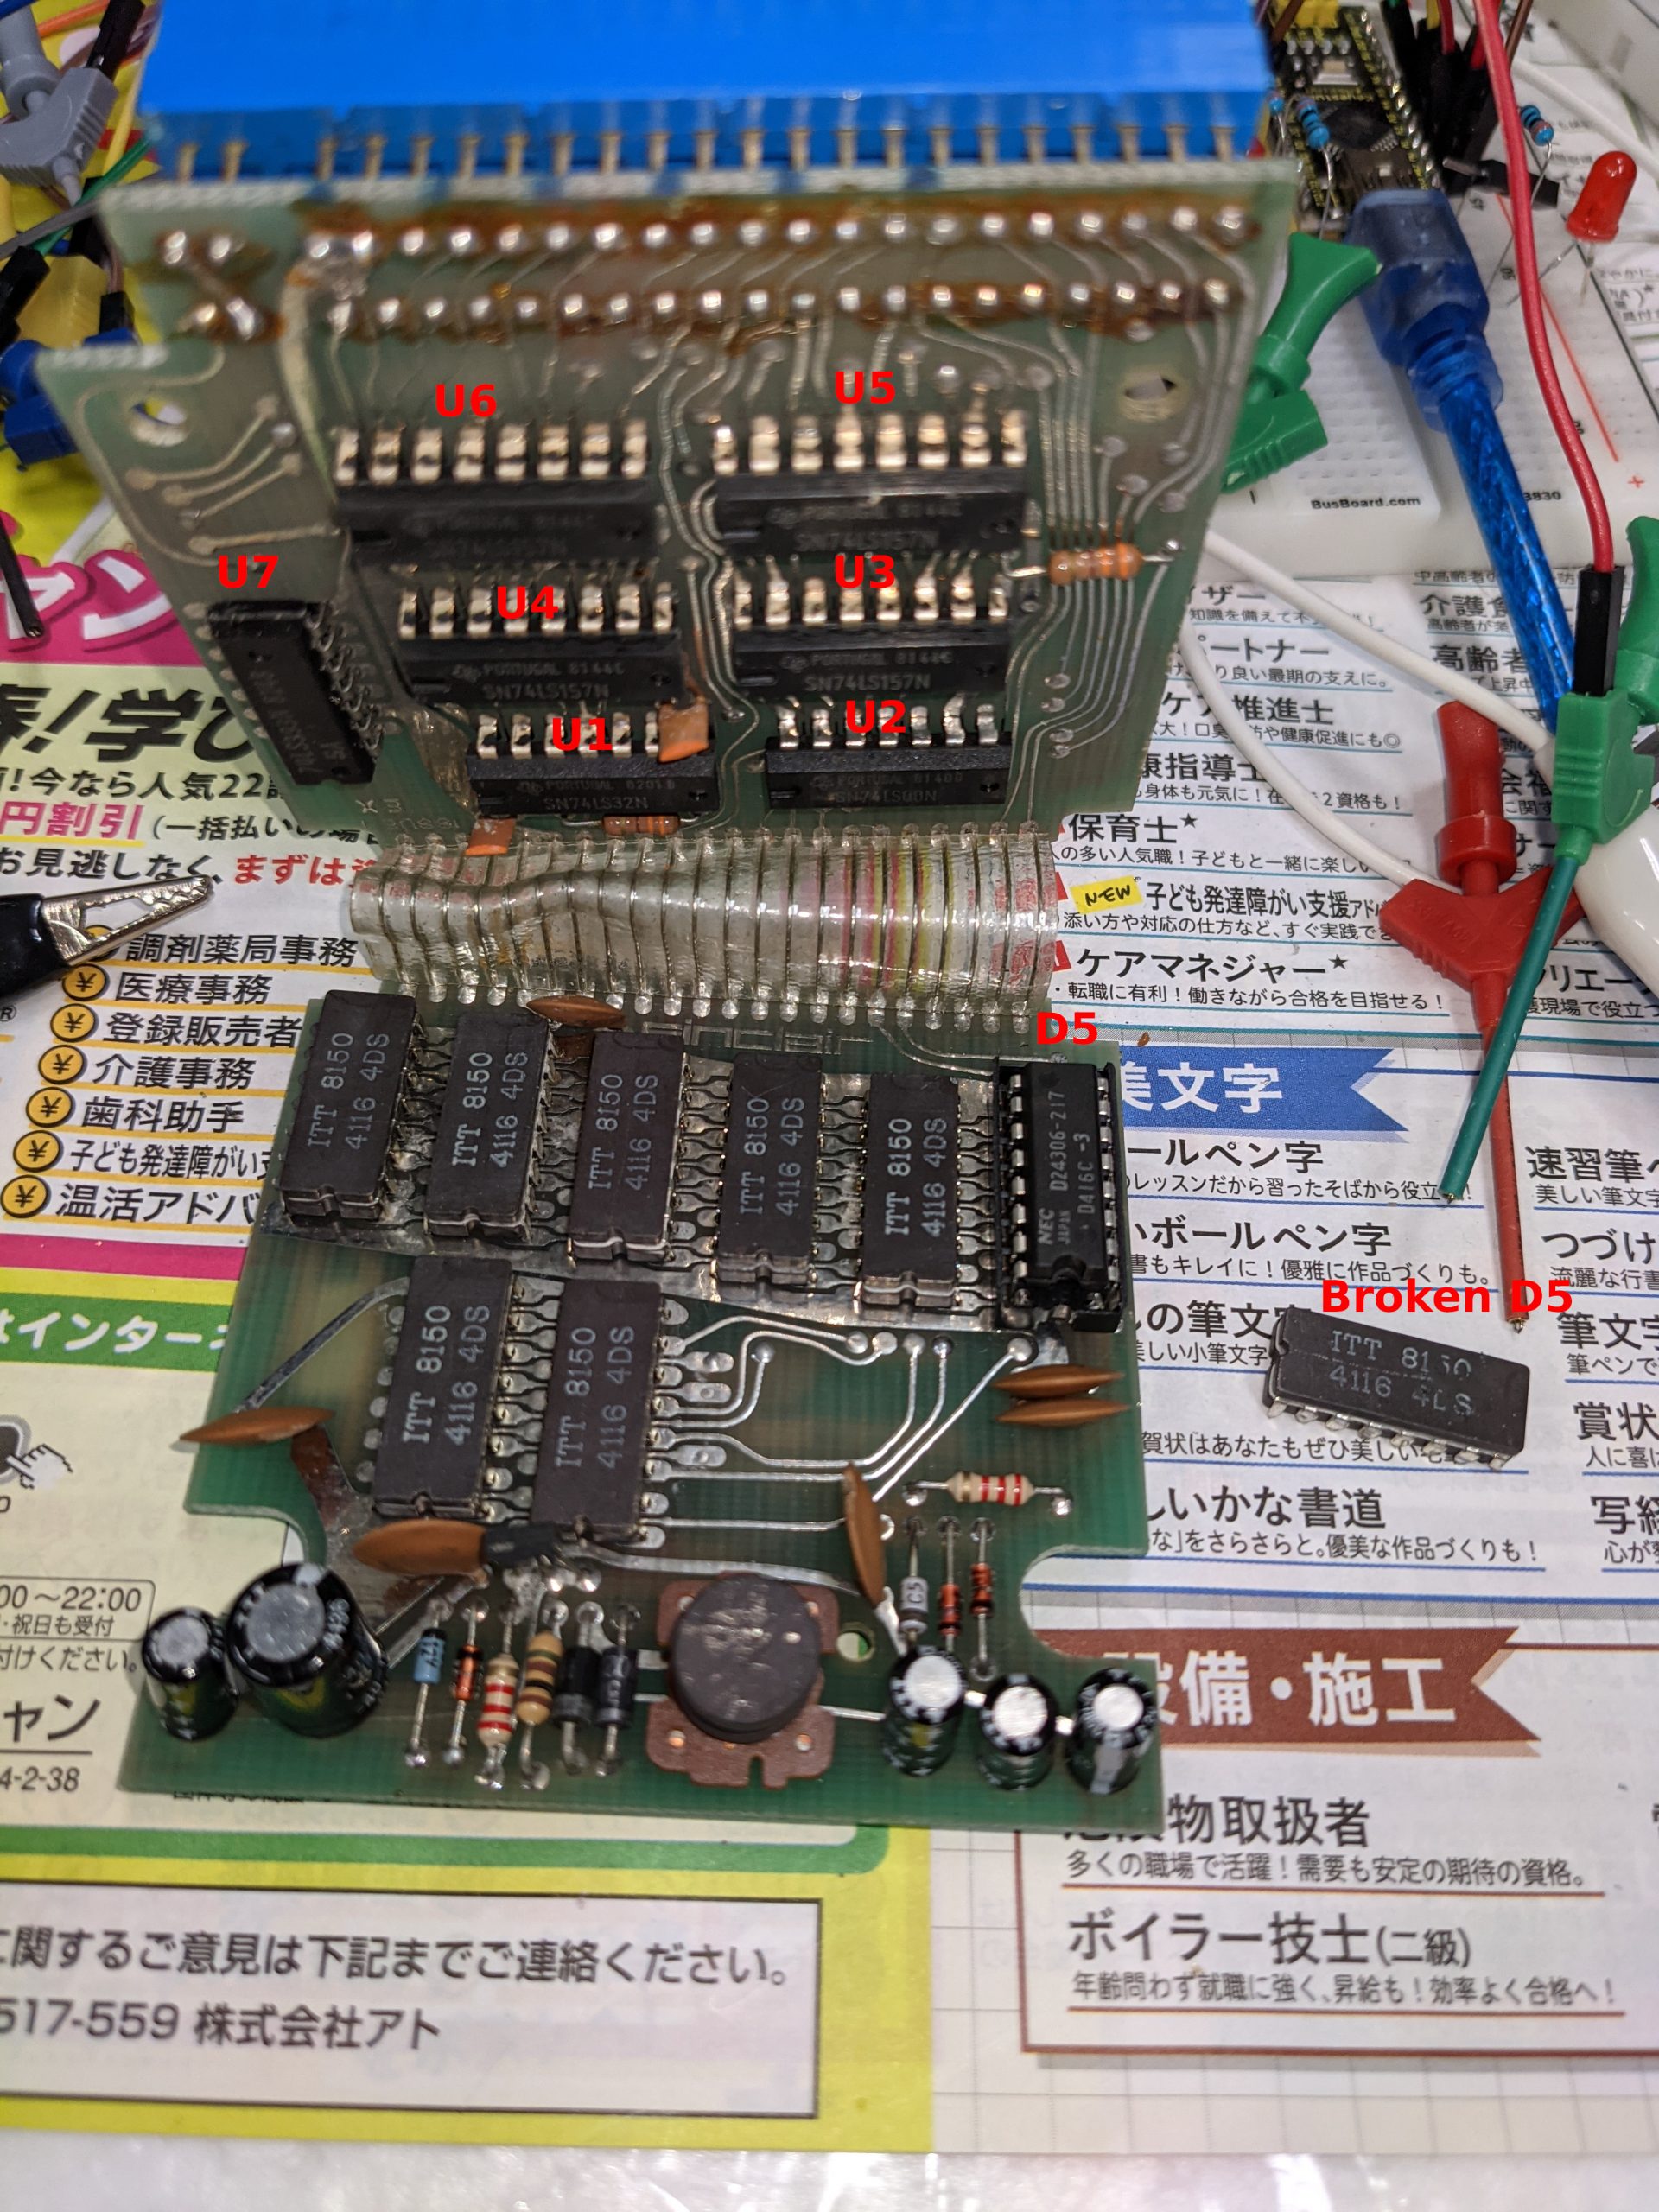
Here is an actual picture (with the bad RAM chip replaced) that shows which chips are where:
The ZX81 RAM pack is made of two circuit boards. These circuit boards are sandwiched together. The pins connecting the two boards are very flexible, so you can just apply a small amount of force and bend the two boards apart. One board has logic chips (the aforementioned NAND chip, an OR chip, four data selector chips (74LS157) and a dual 4-bit counter chip (74LS393)). The other has the DRAM chips and some circuitry to generate -5V and 12V from 5V and 9V input. My voltages were all good and I didn’t see anything unusual there, so I didn’t really look into it too much. If you need to debug the power circuitry, you may need to know how to generate negative voltage (https://www.allaboutcircuits.com/projects/build-your-own-negative-voltage-generator/). I also created a rough simulation of the power circuitry on https://www.falstad.com/circuit/. If you are interested, go to File -> Import from Text and paste the following code, but I don’t think I’m using the correct transformer and there may be other issues:
$ 1 0.000005 24.46919322642204 50 5 43 5e-11
169 112 112 192 112 0 4 9 -1.3552527156068805e-20 0.05437017461335131 0.022386130031495474 0.99
R 192 112 128 64 0 0 40 9 0 0 0.5
w 192 144 272 144 0
w 272 144 272 256 0
t 240 272 272 272 0 -1 17.389821061615624 -0.6849346284276479 100 default
w 272 288 272 336 0
w 192 224 288 224 0
d 336 224 288 224 2 default
34 zener-12 1 1.7143528192810002e-7 0 2.0000000000000084 12 1
z 336 224 400 224 2 zener-12
d 336 224 336 256 2 default
w 336 256 336 336 0
r 192 224 192 272 0 100
w 192 272 240 272 0
r 192 272 192 336 0 2200
g 192 336 144 336 0 0
w 192 336 272 336 0
w 304 336 336 336 0
w 192 176 224 176 0
w 224 176 224 384 0
w 272 336 304 336 0
d 304 384 304 336 2 default
d 352 384 304 384 2 default
r 352 384 416 384 0 2200
34 zener-5.1 1 1.7143528192810002e-7 0 2.0000000000000084 5.1 1
z 416 384 416 336 2 zener-5.1
209 352 336 352 384 0 0.000001 5.679241726295006 1 1
w 224 176 352 176 0
d 352 176 400 176 2 default
w 400 176 400 224 0
d 400 112 400 176 2 default
w 192 112 400 112 0
w 400 112 464 112 0
w 416 384 448 384 0
w 416 336 464 336 0
w 464 336 464 256 0
209 464 208 464 256 0 0.000022000000000000003 8.999999999994335 1 1
w 464 112 464 160 0
c 400 224 400 336 0 0.00009999999999999999 9.397384509781268 0.001
w 352 336 400 336 0
w 336 336 352 336 0
w 400 336 416 336 0
O 384 416 432 416 1 0
O 400 224 448 224 1 0
c 192 176 192 224 0 0.000022 -18.406729087662764 0.001
c 224 384 304 384 0 0.000001 -0.8460828370149334 0.001
r 464 160 464 208 0 1000
r 448 384 512 384 0 1000000
g 512 384 560 384 0 0
x 9 10 431 32 4 16 ZX81\sRAM\spack\spower\ssupply\scircuit\s(9V\s->\s-5,\s12V).\\nChanged\ssome\scapacitors\sto\snon-polarized
x 489 171 629 212 4 16 Added\s1k\sresistor\\nto\sprevent\sshort\\ncircuit
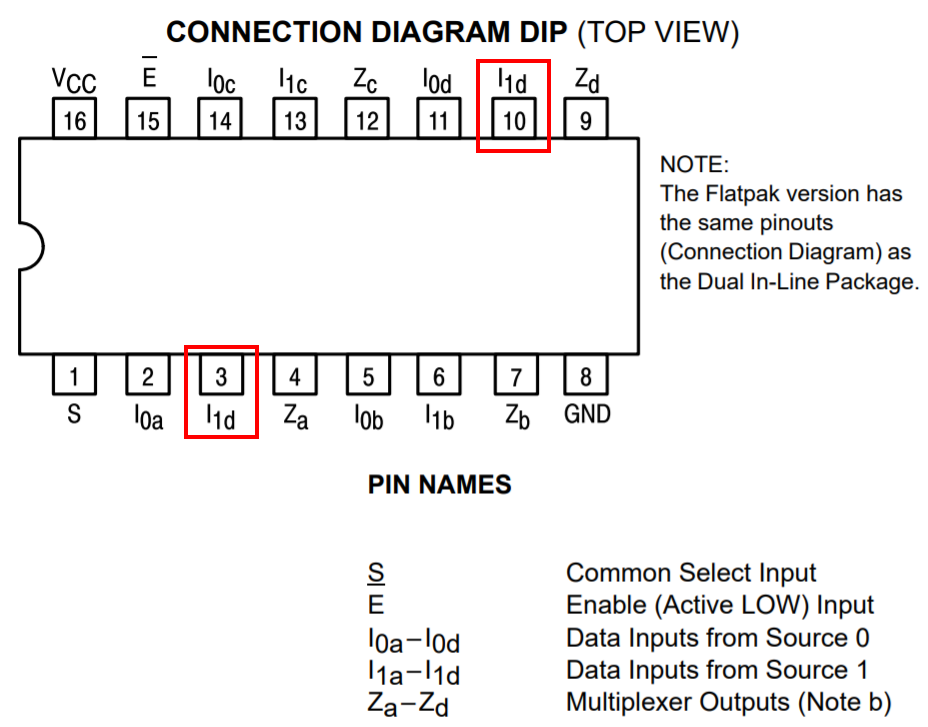
The four 74LS157 selector chips on the non-DRAM board work as two separate entities, that is, the “selector” inputs are tied together for the lower two chips and tied together for the higher two chips. When you look for 74LS157 pinouts on the internet, you’ll often find an OCR’d and slightly wrong pinout. The pin labelled I1d on the bottom side should be labelled I1a instead:
Two I1d pins? Yeah right! The lower one is actually I1a.
The 74LS393 is used by the ZX81 to refresh the DRAM. According to the datasheet, the DRAM has to be refreshed at least every 2 ms. I am guessing that the CPU or ULA periodically generates the RFSH signal, but we don’t have to worry about that in the context of this repair. Each time RFSH goes low (low because there is a NOT gate built from one of the NAND gates between RFSH and pin 1 (“clock”) of the 74LS393 counter chip), the counter chip adds +1 to its internal state. Additionally, the RFSH signal also goes into the first pair of selector chips, which causes the output of the counter to be selected as the output. Otherwise, address lines A0-A6 are used as the output.
The second pair of selector chips has address lines A7-A13 as one set of inputs, and the output of the previous selector chip as the other set of inputs. The circuit that goes into the selector pin is somewhat complicated, as it uses four different inputs to decide which set of inputs to select. I decided to make a truth table to better understand it. If you need to understand this circuit, the truth table or OpenDocument / Excel files below may help a little bit:
The circuit contains a number of RC delay circuits to make the timing work, but as the delay is on the order of 10-20 ns, I don’t have to worry about those when driving this circuit using an Arduino — I’m using digitalRead() and digitalWrite(), and these functions take a couple of microseconds to complete. Looking at the timing diagram in the DRAM IC’s datasheet however, it is relatively obvious that these delays are needed.
As stated above, the DRAMs are all connected in parallel on all pins except the data pins. And while the DRAM chips have separate pins for input and output, the RAM pack ties these together as they are of course not used at the same time — you either read or write.
Some more notes on the timing — programming the Arduino like this will drive the chips very slowly, but according to the datasheet, we don’t really have to worry about being too slow in most cases. Some parameters have “max” values on the order of 10s or 100s of ns, but the notes alleviate most concerns in that area. The maximum RAS/CAS pulse width of 32000/10000 ns should be okay with just digitalRead()/digitalWrite() (I didn’t measure too much though, to be honest). Here is the code doing the write and CAS pulses, and what we know about digitalWrite(), this should be just under 10000 ns:
void writeAddress(...) {
...
  /* write */
  digitalWrite(WR, LOW);

  /* tRCD max is 50 ns, but footnote 10 states:
   * "If tRCD is greater than the maximum recommended value shown in this table, tRAC will increase by the amount that tRCD exceeds the value shown."
   * Therefore this is not a hard maximum and we don't have to worry too much about being too slow */
  digitalWrite(XA14, HIGH); /* pulls CAS low after 10-20ns */

  digitalWrite(WR, HIGH);
  digitalWrite(XA14, LOW);
Here’s an oscilloscope screenshot for just the WR pulse (which should have the same timing), which is approximately… 10 microseconds!
-Width=10.00us :o
There is code out there to test 4116 RAM ICs. However, the chips in my RAM pack weren’t socketed so I couldn’t take them out very easily. And it’s not certain if we can just attach the Arduino directly to the DRAM chips’ pins — if we apply power to the board we will power up the rest of the circuitry and that could interfere with our testing — the selector chips might produce 1s when we want 0s, or vice versa. I took this code and modified it to work with the rest of the circuitry. I originally planned on testing two bits at once (i.e., two DRAM chips at once), but I ran out of cables. I’ve left in the code however, commented.
Since we don’t have a lot of pins on the Arduino (or connectors that we can use to connect the Arduino with the RAM pack), I decided to enlist the binary counter chip’s help to generate the addresses. Check out the advanceRow() function to see how easy this is — we just need to manipulate RFSH. (Note that “row” means the same thing as it does in the datasheet — the DRAM chip is organized into 128 “rows” and 128 “columns”, 128×128 = 16384 bits.)
I also decided to write two different values in two successive addresses before reading back from these addresses. This is important because otherwise the Arduino may just read whatever it just put on the wire itself. I.e., if you take an Arduino that isn’t connected to anything at all and do something like the following, your digitalRead may return whatever you wrote using digitalWrite!
digitalWrite(13, HIGH);
val = digitalRead(13); // val may be 1 now!
Which is why we instead do something like this (c is column, v is value, row is set elsewhere):
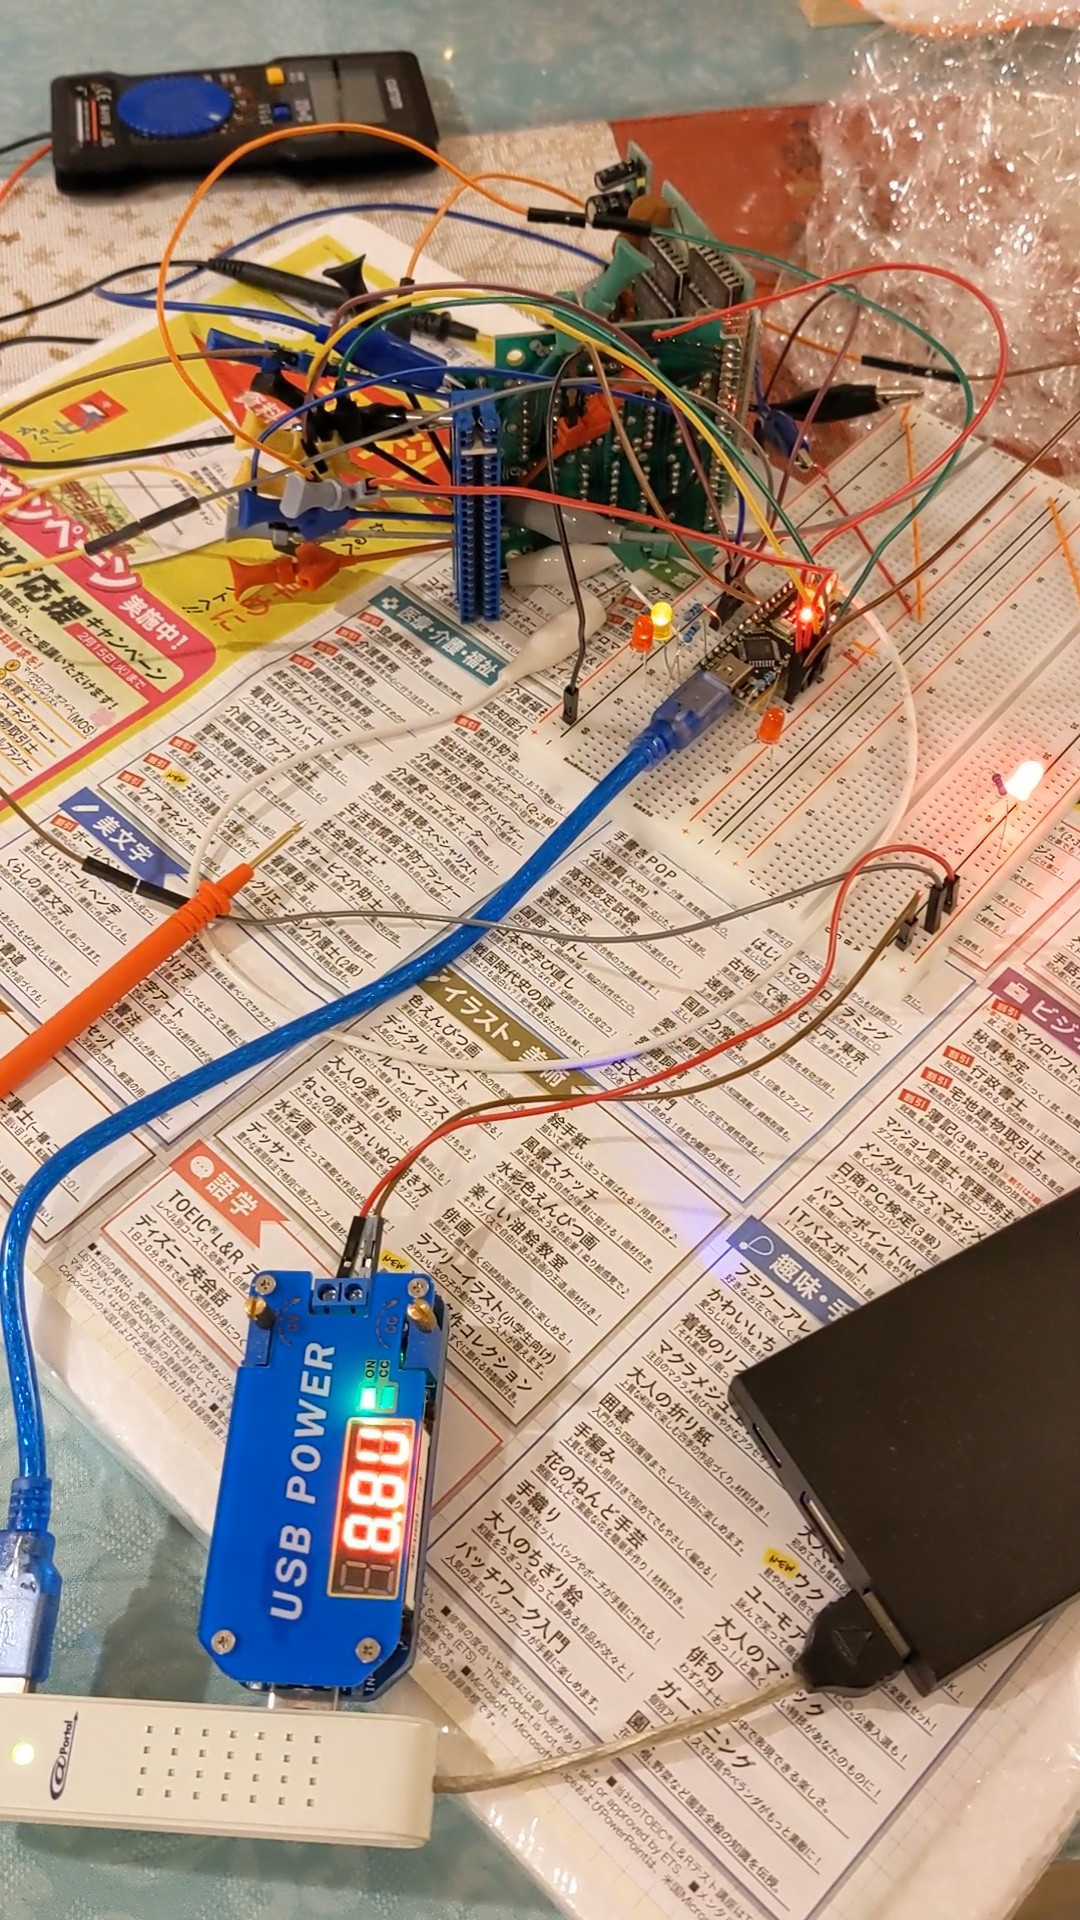
I also changed the error() and ok() functions. ok() will make a (preferably green) LED blink slowly, error() will made a (preferably red) LED and the other LED blink alternatingly.
Diagnostic surgery in progress.
Here is the code:
/* Modified by sneep to test the Sinclair ZX81 RAM pack.
* Original code is at http://labs.frostbox.net/2020/03/24/4116-d-ram-tester-with-schematics-and-code/
* The Arduino doesn't have enough pins to check all outputs at
* the same time so we'll test one (out of eight) at a time;
* rewiring is required between tests.
*
* Unlike the previous version of this source code, we go through
* the onboard logic (a couple of ORs, ANDs, multiplexers, and a
* counter for refresh) rather than talking to the 4116 RAM ICs
* directly.
* It's probably not possible to check the 4116 chips in-circuit
* using the original source code, as we would apply power to
* everything and would then cause our address signals to fight
* against the multiplexer's outputs.
*
* NOTE: As we are using digitalWrite, this is a very slow test.
* We go beyond the 'max' value recommended in the datasheet for
* one thing, and go way beyond the 'min' values -- borderline
* chips could pass our tests but fail when driven by the ZX81.
*
* NOTE: At least the init refresh cycles may stop working if we
* replace digitalWrite by something faster (init refresh).
*/
//This is for an arduino nano to test 4116 ram ic. Please see video https://youtu.be/MVZYB54VD2g and blogpost
//Cerated in november 2017. Code commented and posted march 2020.
//Most of the code and design is from http://forum.defence-force.org/viewtopic.php?p=15035&sid=17bf402b9c2fd97c8779668b8dde2044
//by forum member "iss"" and modified to work with 4116 D ram by me Uffe Lund-Hansen, Frostbox Labs.
//This is version 2 of the code. Version 1 had a very seroisl bug at approx. line 43 which meant it only checked ram address 0
//#include <SoftwareSerial.h>
#define XD0 A1
#define MREQ 5
#define WR 6
#define RFSH 10
#define XA7 4
#define XA8 2
#define XA9 3
#define XA10 A3 // orange
#define XA11 A4 // yellow
#define XA12 A5 // green
#define XA13 A2
#define XA14 A0
#define R_LED 13 // Arduino Nano on-board LED
#define G_LED 8
//Use the reset button to start the test on solder an external momentary button between RST pin and GND pin on arduino.
#define BUS_SIZE 7
#define NO_DEBUG 0
#define VERBOSE_1 1
#define VERBOSE_2 2
#define VERBOSE_3 3
#define VERBOSE_4 4
#define VERBOSE_MAX 5
#define DEBUG NO_DEBUG // VERBOSE_3
#define DEBUG_LED_DELAY 0 /* Set to 0 for normal operation. Adds a delay inbetween when double-toggling fast signals, e.g. RFSH */
int g_row = 0;
const unsigned int a_bus[BUS_SIZE] = {
XA7, XA8, XA9, XA10, XA11, XA12, XA13
};
void setBus(unsigned int a) {
int i;
/* Write lowest bit into lowest address line first, then next-lowest bit, etc. */
for (i = 0; i < BUS_SIZE; i++) {
digitalWrite(a_bus[i], a & 1);
a /= 2;
}
}
void advanceRow() {
/* Keep track of which row we're on so we can put that in our debug output */
g_row = (g_row + 1) % (1<<BUS_SIZE);
/* Counter chip should be fast enough.
* NOTE there is a NOT gate between arduino pin and counter chip */
digitalWrite(RFSH, LOW);
if (DEBUG_LED_DELAY) {
interrupts();
delay(DEBUG_LED_DELAY);
noInterrupts();
}
digitalWrite(RFSH, HIGH);
}
void writeAddress(unsigned int c, int v0, int v1) {
/* Set column address in advance (arduino may be too slow to set this later) (won't appear on the RAM chip pins yet) */
setBus(c);
if (DEBUG >= VERBOSE_MAX) {
interrupts();
Serial.print("Writing v0 ");
Serial.println(v0);
// Serial.print("Writing v1 ");
// Serial.println(v1);
noInterrupts();
}
/* Set val in advance (arduino may be too slow to set this later) (chip doesn't care what's on this pin except when it's looking) */
pinMode(XD0, OUTPUT);
// pinMode(XD1, OUTPUT);
digitalWrite(XD0, (v0 & 1)? HIGH : LOW);
// digitalWrite(XD1, (v1 & 1)? HIGH : LOW);
digitalWrite(MREQ, LOW); /* pulls RAS low */
/* write */
digitalWrite(WR, LOW);
/* tRCD max is 50 ns, but footnote 10 states:
* "If tRCD is greater than the maximum recommended value shown in this table, tRAC will increase by the amount that tRCD exceeds the value shown."
* Therefore this is not a hard maximum and we don't have to worry too much about being too slow */
digitalWrite(XA14, HIGH); /* pulls CAS low after 10-20ns */
digitalWrite(WR, HIGH);
digitalWrite(XA14, LOW);
digitalWrite(MREQ, HIGH);
pinMode(XD0, INPUT);
// pinMode(XD1, INPUT);
}
void readAddress(unsigned int c, int *ret0, int *ret1) {
/* set column address (won't appear on the RAM chip pins yet) */
setBus(c);
digitalWrite(MREQ, LOW); /* pulls RAS low, row address will be read in after tRAH (20-25 ns) */
/* Need to wait tRCD (RAS to CAS delay time), min. 20ns max. 50 ns, but a footnote implies that we can go over the max */
digitalWrite(XA14, HIGH); /* sets S to high and pulls CAS low after 10-20ns (it's correct to have the column address on the bus before pulling CAS low) */
/* Need to wait tCAC (time CAS-low to data-valid), but Arduino is slow enough for our purposes */
/* get current value
* datasheet "DATA OUTPUT CONTROL", p. 8:
* "Once having gone active, the output will remain valid until CAS is taken to the precharge (logic 1) state, whether or not RAS goes into precharge."
*/
*ret0 = digitalRead(XD0);
// *ret1 = digitalRead(XD1);
digitalWrite(XA14, LOW);
digitalWrite(MREQ, HIGH);
}
void error(int c, int v, int read_v0_0, int read_v1_0, int read_v0_1, int read_v1_1)
{
unsigned long a = ((unsigned long)c << BUS_SIZE) + g_row;
interrupts();
Serial.print(" FAILED $");
Serial.println(a, HEX);
Serial.print("Wrote v/!v: ");
Serial.println(v);
Serial.println(!v);
Serial.print("Read v0_0: ");
Serial.println(read_v0_0);
// Serial.print("Read v1_0: ");
// Serial.println(read_v1_0);
Serial.print("Read v0_1: ");
Serial.println(read_v0_1);
// Serial.print("Read v1_1: ");
// Serial.println(read_v1_1);
Serial.flush();
while (1) {
blink_abekobe(100);
}
}
void ok(void)
{
digitalWrite(R_LED, LOW);
digitalWrite(G_LED, LOW);
interrupts();
Serial.println(" OK!");
Serial.flush();
while (1) {
blink_green(500);
}
}
void blink_abekobe(int interval)
{
digitalWrite(R_LED, LOW);
digitalWrite(G_LED, HIGH);
delay(interval);
digitalWrite(R_LED, HIGH);
digitalWrite(G_LED, LOW);
delay(interval);
}
void blink_green(int interval)
{
digitalWrite(G_LED, HIGH);
delay(interval);
digitalWrite(G_LED, LOW);
delay(interval);
}
void blink_redgreen(int interval)
{
digitalWrite(R_LED, HIGH);
digitalWrite(G_LED, HIGH);
delay(interval);
digitalWrite(R_LED, LOW);
digitalWrite(G_LED, LOW);
delay(interval);
}
void green(int v) {
digitalWrite(G_LED, v);
}
void fill(int v) {
int i, r, c, g = 0;
int read_v0_0, read_v1_0;
int read_v0_1, read_v1_1;
if (DEBUG >= VERBOSE_1) {
Serial.print("Writing v: ");
Serial.println(v);
}
for (r = 0; r < (1<<BUS_SIZE); r++) {
if (DEBUG >= VERBOSE_1) {
interrupts();
Serial.print("Writing to row ");
Serial.println(g_row);
noInterrupts();
}
for (c = 0; c < (1<<BUS_SIZE); c++) {
if (DEBUG >= VERBOSE_4) {
interrupts();
Serial.print("Writing to column ");
Serial.println(c);
noInterrupts();
}
green(g ? HIGH : LOW);
/* The same two data pins are used for both read and write,
* so when nothing is connected we would just read the value we just wrote.
* So let's write 0 and 1 (or 1 and 0) to two addresses and read them back.
* We should get 0 and 1, but if there's nothing connected we'd get 1 and 0,
* which
*/
        writeAddress(c, v, v);
        writeAddress(c+1, !v, !v);
        readAddress(c, &read_v0_0, &read_v1_0);
        readAddress(c+1, &read_v0_1, &read_v1_1);
if (DEBUG >= VERBOSE_3) {
interrupts();
Serial.print("Read v0_0: ");
Serial.println(read_v0_0);
// Serial.print("Read v1_0: ");
// Serial.println(read_v1_0);
Serial.print("Read v0_1: ");
Serial.println(read_v0_1);
// Serial.print("Read v1_1: ");
// Serial.println(read_v1_1);
noInterrupts();
}
if ((read_v0_0 != v) || // (read_v1_0 != v) ||
(read_v0_1 != !v)) { //|| (read_v1_1 != v)) {
error(c, v,
read_v0_0,
read_v1_0,
read_v0_1,
read_v1_1);
}
g ^= 1;
}
advanceRow();
}
for (i = 0; i < 50; i++) {
blink_redgreen(100);
}
}
void setup() {
int i;
Serial.begin(115200);
while (!Serial)
; /* wait */
Serial.println();
Serial.print("ZX81 RAM PACK TESTER");
for (i = 0; i < BUS_SIZE; i++)
pinMode(a_bus[i], OUTPUT);
pinMode(XA14, OUTPUT);
pinMode(MREQ, OUTPUT);
pinMode(WR, OUTPUT);
pinMode(R_LED, OUTPUT);
pinMode(G_LED, OUTPUT);
/* Input and output is tied together on RAM pack.
* We'll leave the pinMode on INPUT for most of the time and only set to OUTPUT when writing.
*/
pinMode(XD0, INPUT);
// pinMode(XD1, INPUT);
digitalWrite(WR, HIGH);
digitalWrite(MREQ, HIGH);
digitalWrite(XA14, HIGH);
Serial.flush();
digitalWrite(R_LED, LOW);
digitalWrite(G_LED, LOW);
noInterrupts();
/* Datasheet says: "Several cycles are required after power-up before proper device operation is achieved. Any 8 cycles which perform refresh are adequate for this purpose."
* We'll just perform a refresh on all rows. */
for (i = 0; i < (1<<BUS_SIZE); i++) {
/* Should work fine timing-wise with standard Arduino digitalWrite() (tRC min: 375 ns, no max apparently) */
interrupts();
Serial.print("init: refreshing row ");
Serial.println(g_row);
Serial.flush();
noInterrupts();
advanceRow();
digitalWrite(MREQ, LOW);
digitalWrite(MREQ, HIGH);
}
}
void loop() {
interrupts(); Serial.print("."); Serial.flush(); noInterrupts(); fill(0);
interrupts(); Serial.print("."); Serial.flush(); noInterrupts(); fill(1);
ok();
}
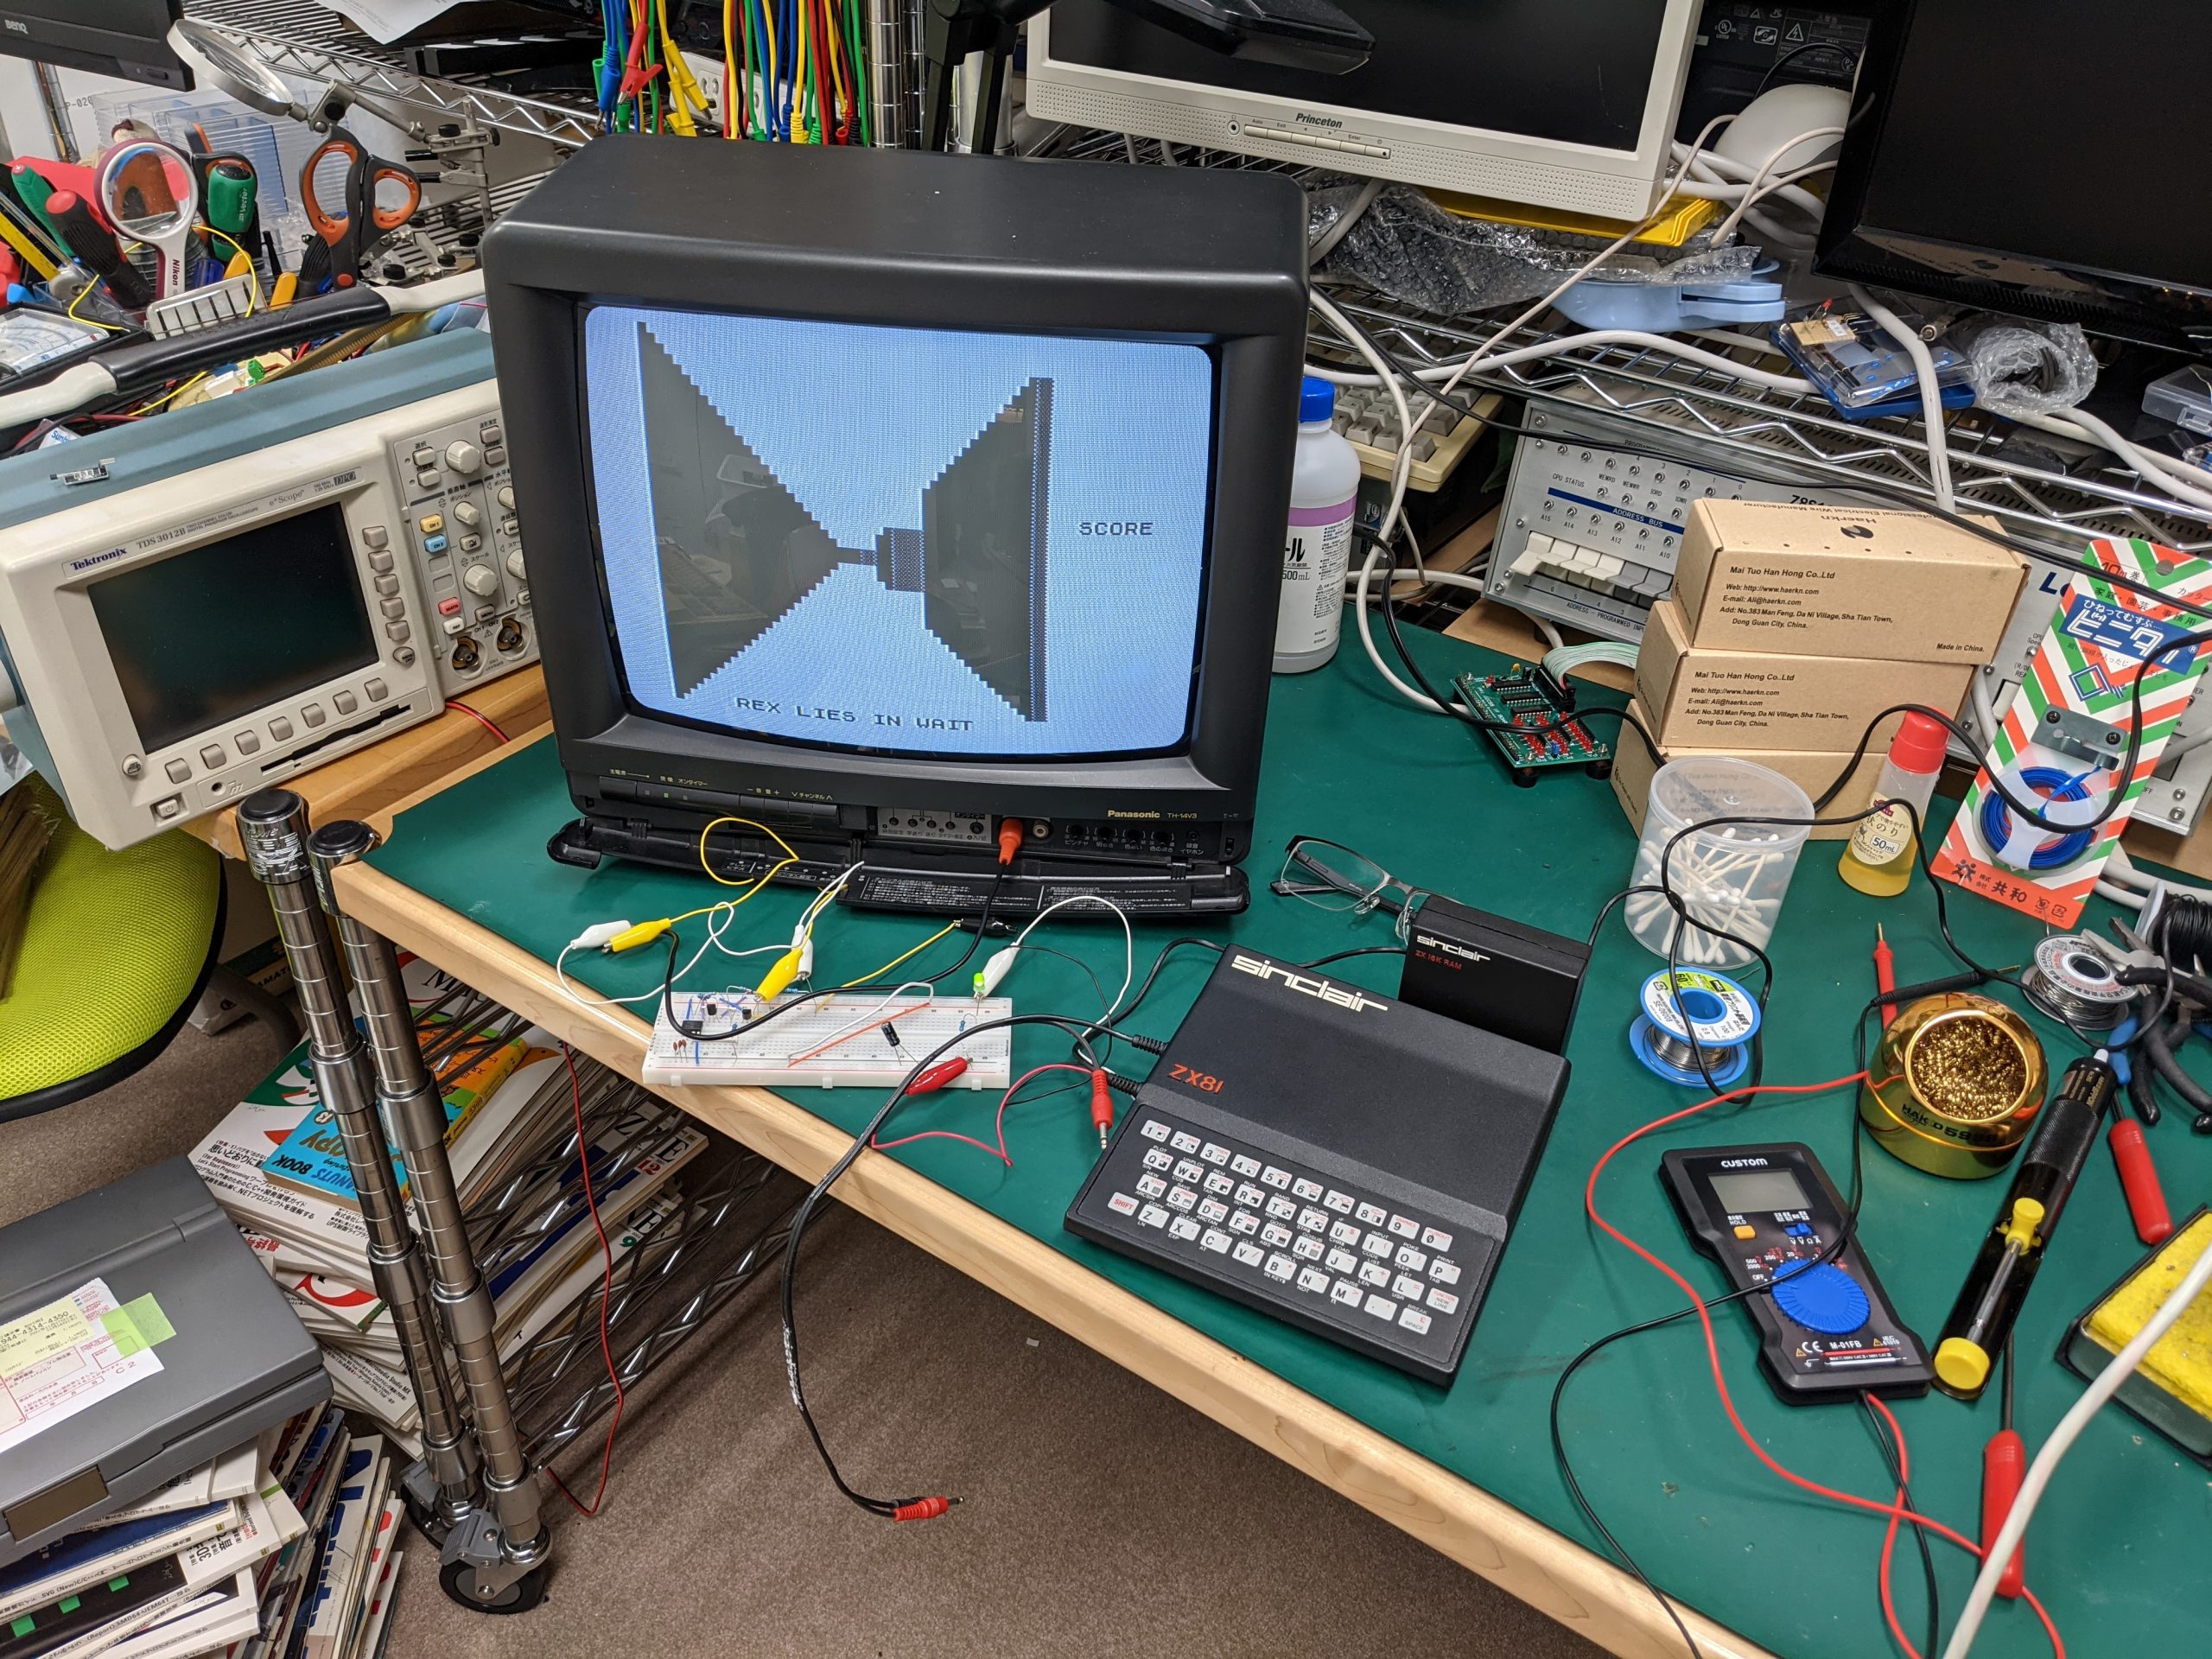
In my case, all DRAM chips passed the test except the one controlling D5. Even the very first read wouldn’t work out. I therefore replaced that one and hooray, things worked again! Here’s a pic of a 3d maze game running with the repaired RAM.
Some random notes on how to do the actual replacement
Before replacing the defective RAM chip I also tried piggybacking, but that didn’t make the test pass. I was planning on using my oscilloscope to get an idea of what’s going wrong when piggybacking, but things were just too finicky and I abandoned that plan. If you try yourself, make sure to put your multimeter in continuity mode and check that your piggybacked RAM chip is actually making contact.
I cut off the legs of the chip I 99% knew was bad and then desoldered the legs. Applying heat using a soldering iron from above and using a desoldering pump from below (or the other way round) worked reasonably well.
It should be okay to use a socket on most chips. Here’s a photo of the boards sandwiched up again after the replacement. You can see that there’s quite some clearance left:
Let me know if you have any questions about this repair.
Over the last few weeks~months, I have been repairing a Sinclair ZX81.
This was the first time I had a look at a ZX81. I am actually not 100% sure if there really was no video, but based on the things I did after I finally figured out what I was doing, it’s reasonably likely that I didn’t accidentally “repair” (and break and then repair again) something that wasn’t broken in the first place.
System
There was no video — well, I don’t know if that was due to the TV somehow not being able to tune into the channel it said it was tuned into. Anyway, I took out all the chips from their sockets and cleaned them thoroughly, as that is what fixed a VIC-20 I worked on earlier. Still no luck, so I checked continuity between the sockets’ pins’ solder blobs on the underside of the mainboard and the chip pins, and identified a lot of bad connections. I used a screwdriver to forcefully bend the chips’ pins to have them make contact with the sockets, and in the end I got continuity everywhere and plausible activity on the oscilloscope.
But still no video output, so we took the signal on the ULA’s pin 16 and fed that into the TV’s composite input. Nothing… Or wait, wrong, that’s just a very dark picture, i.e., black on dark-grey.
Keyboard
Anyway, turning the TV’s brightness all the way up I was able to test a few things, and found that the keyboard had some keys that wouldn’t do anything.
The keyboard’s ribbon cable had a broken trace. This was easy to find using a combination of staring and a multimeter in continuity mode — first stare at a schematic to see which lines the keys that aren’t working are connected to, then put the two leads in the same spot and then go up the trace until it doesn’t beep anymore. Then stare some more and you should be able to see that the trace is indeed very slightly broken around that spot.
Note that opening and closing your ZX81 repeatedly will probably take its toll on this ribbon cable. At first I didn’t even know that it was possible to disconnect the ribbon cable without desoldering it. It’s very possible and you should probably do it — you tug at the ribbon cable to pull it out of the connector, not the connector out of the board. Anyway, I only had one broken trace at first, and after a couple times closing and re-opening the ZX81 (don’t do that in the first place if you can avoid it) I had two.
The first (original) one was very close to the connector, so you take a pair of scissors and cut off a a small bit, and it’s like you have a brand-new cable again. It takes some effort to put the ribbon cable back into the connector, but it’s not that hard.
The second broken trace was way higher up, but fortunately for me it was the right-most trace, which is probably easier to “fix” than other traces. Do not use a soldering iron. I did that, and it just melted the cable. It’s impossible to bodge wire this with solder as far as I can tell. What worked for me was conductive foil tape.
Video
A lot of people seem to have had success just adding an emitter-follower between the TV and ULA pin 16, but that didn’t do anything at all. I also tried dropping the voltage using one or multiple diode drops right after the emitter-follower, but that didn’t seem to have much of an effect.
The video signal looked off on the oscilloscope, but to be honest I hadn’t seen a black and white composite signal on an oscilloscope before. I did some digging, and found the problem: there’s no black porch! Fortunately, that applies to many ZX81s, and there are people who have thought about the problem. For example, check out this page: http://zx.zigg.net/misc-projects/ (or the accompanying video: https://www.youtube.com/watch?v=1irH3KuGyl0)
I used this person’s 555-based circuit, which wouldn’t immediately work. After some thinking and probing and staring at the oscilloscope, I found that the voltage during the horizontal blank wasn’t low enough to trigger the 555 (it has to be less than one third of the 555’s main input voltage). I added a resistor divider and suddenly had a beautiful signal!! This was the first time I ever saw a ZX81 boot up properly.
Unfortunately, the 16KB RAM pack didn’t work. Inserting it into the ZX81 would produce a garbled screen. So I reverse-engineered the RAM pack and tested its memory using an Arduino, and was able to identify the faulty IC and replace it. More on that in this post: Testing a ZX81 RAM pack with an Arduino
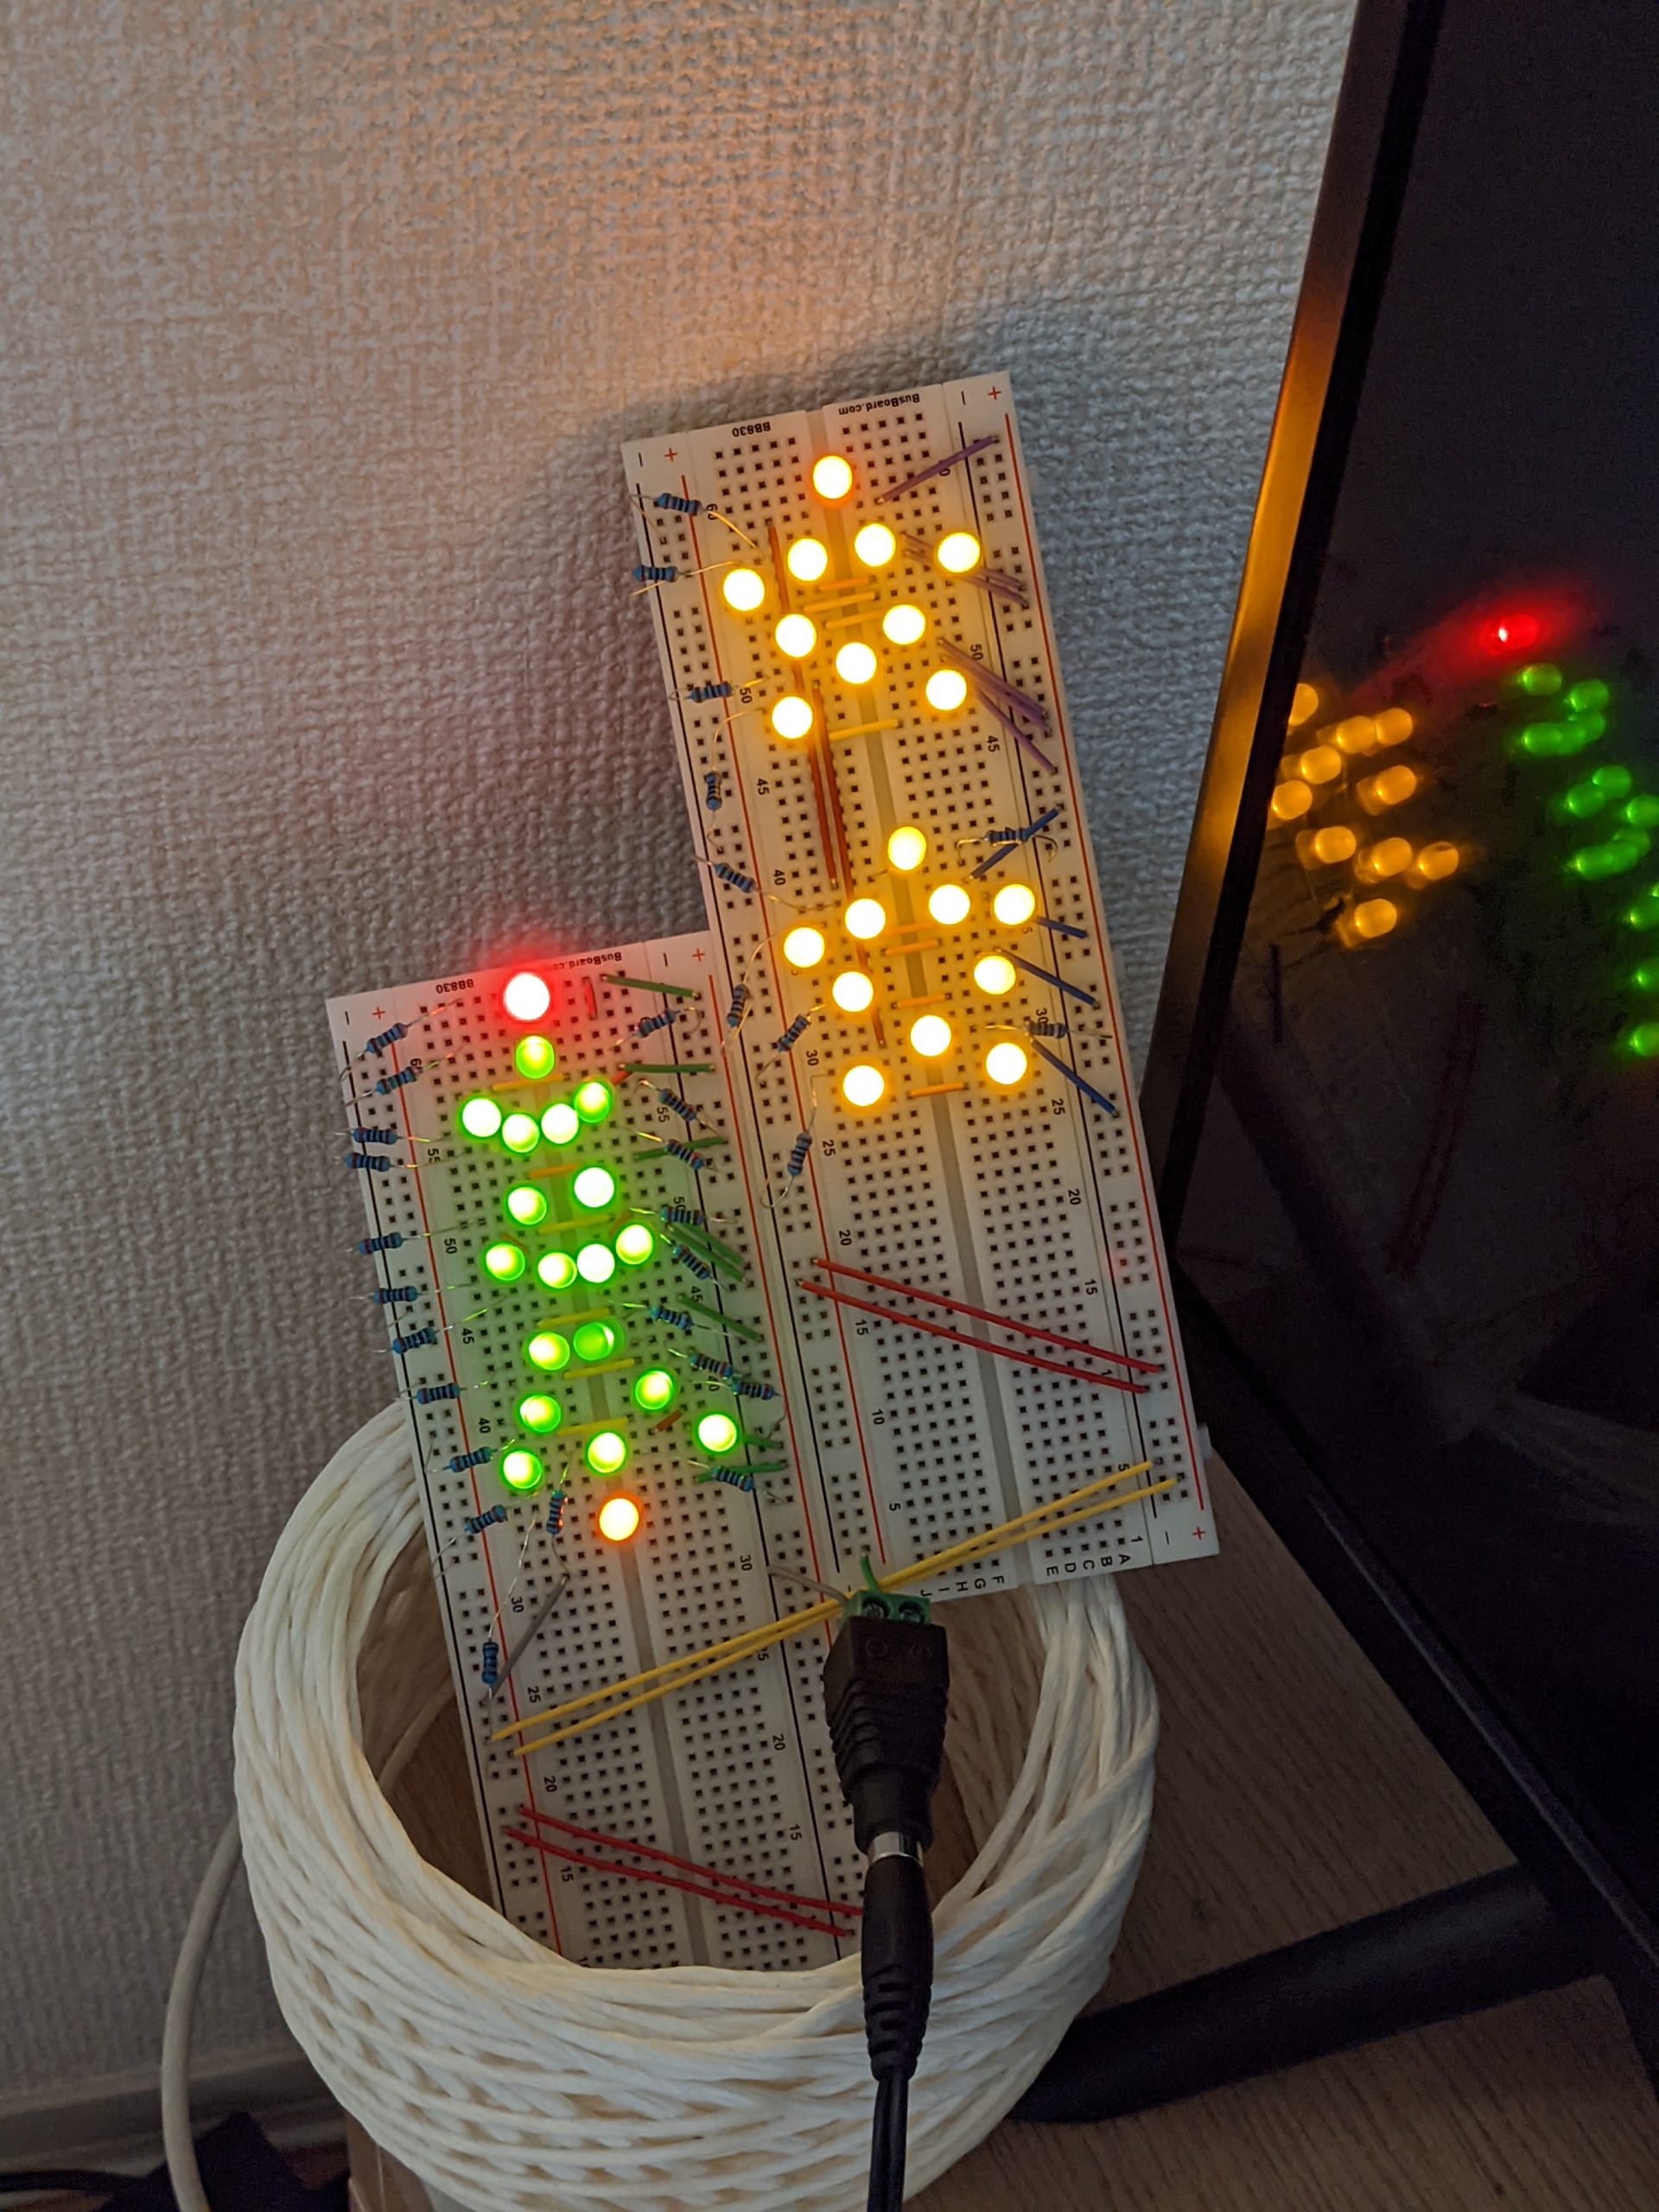
Just a thing I quickly made a short while ago. There’s nothing special going on. The board on the left has one resistor per LED, on the board on the right, two LEDs and one resistor are each wired as a series circuit.
Note: I don’t leave this running unattended — I’m reasonably sure the entire thing would fall to the floor in a medium~major earthquake and the risk of causing a short is relatively high. Not that the short would necessarily cause a fire, but better safe than sorry.
There are probably a million other reasons you could get this error, but I didn’t see anyone document the case I got it: I wrote some raw assembly (i.e., hexadecimal machine code) and got the instruction length wrong. I.e., something like this:
__asm volatile(
    ".byte 0x00 \n"
);
Well, AVR instructions are 16 bits, so clearly the one-byte thing above wouldn’t encode a valid instruction and would ruin alignment, so it would have to look at this:
I recently had the chance to repair an NTSC VIC-20 that would not boot and just show a black screen.
The version I got to work on has a power brick containing a transformer. That power brick converts mains input to 9 volts AC, which then is fed directly into the computer. The rest of the (linear) power supply circuitry is inside the computer, including a very large capacitor. This capacitor wasn’t bulging but showed some signs of electrolyte leakage but that was not the cause of the problem. In fact I chose to skip replacing the capacitor for now.
In order to diagnose the problem I first checked the voltages, which all checked out perfectly.
Then I used an oscilloscope to check what the VIC and the CPU were doing.
The main clock signal is generated by the VIC chip from the output of a 14.31818 MHz crystal. Everything looked perfect in this area.
I decided to reseat all the socketed IC chips (CPU, ROMs, IO chips — I was not able to extract the VIC chip even though it was socketed), but that did not help.
The CPU has a reset pin which is held low for a few seconds and then goes high, this worked perfectly too. There is a tiny 555 IC placed on the board responsible for doing this.
However there was no activity on the address lines at all; it seemed like all address lines were held high. (There is a possibility that some lines (A0~A3) were low, maybe I did not check carefully enough.) However, occasionally, right after clicking the power switch there seemed to be some normal-looking activity on the CPU’s address lines, which very quickly faded away. This happened maybe once in 10 or 20 power cycles.
So then my first suspicion was that the 6502 CPU might have given up. Thankfully, I had access to another board using a 6502 CPU. (Actually this one was a 65CS02 CPU.) As the voltages looked normal it seemed very low risk to swap the CPUs to see what would happen. Much to my dismay at first, the 6502 CPU extracted from the VIC-20 worked on the other board.
However, I was dismayed only for a few seconds, as the 65CS02 CPU, when put in the VIC-20, didn’t quite make the computer work but I was able to see a lot of activity on the address lines of the CPU now!
The new theory was that the IC pins were much more oxidized than expected. We extracted all the ICs (including VIC) again and gave them a clean up with concentrated alcohol. And it still did not work! However on the oscilloscope most pins now showed normal activity.
Thinking there might be another problem, perhaps with the ROMs, I decided to insert a game cartridge into the cartridge port.
And it booted up!
Okay, is the BASIC ROM busted?
Well. After turning the computer off and taking out the cartridge and turning it on again, it would successfully boot into BASIC! What the?!
I thought that simply reseating ICs would immediately take care of most “bad contact” problems, at least temporarily. Well, turns out that oxidation can be pretty serious sometimes!
We had even checked continuity between IC pins and the socket’s pins on the other side of the board, and got beeps as normal.
So it seems this is not a very good test. Well, today (yesterday actually) I learned.
Another note: the computer and power supply was made with 120V/60 Hz in mind according to the labels on the back, but it worked fine at 100V/50 Hz.
Many websites lack useful features, many websites go to great lengths to prevent you from downloading images, etc.
When things get too annoying I sometimes open the developer tools and write a short piece of JavaScript to help me out. Okay, but isn’t it annoying to open developer tools every time? Yes! So right-click your bookmarks toolbar, press the button to add a bookmark, give it an appropriate title, and in the URL, put “javascript:” followed by the JavaScript code. (Most of the following examples already have javascript: prepended to the one-liner.)
Note that you have to encapsulate most of these snippets in an anonymous function, i.e. (function() { … })(). Otherwise your browser might open a page containing whatever value your code snippet returns.
(It is my belief that all of the following code snippets aren’t copyrightable with a clear conscience, as they may constitute the most obvious way to do something. The code snippets can therefore be regarded as public domain, or alternatively, at your option, as published under the WTFPL.)
Note that these snippets are only tested on Firefox. (They should work in Chrome too, though.)
Hacker News: scroll to next top-level comment
Q: How likely is this to stop working if the site gets re-designed? A: Would probably stop working.
This is a one-liner to jump to the first/second/third/… top-level comment. (Because often the first few threads get very monotonous after a while?) If you don’t see anything happening, maybe there is no other top-level comment on the current page.
javascript:document.querySelectorAll("img[src='s.gif'][width='0']")[1].scrollIntoView(true) # Bookmarklet version. Basically just javascript: added at the beginning.
The “true” parameter in scrollIntoView(true) means that the comment will appear at the top (if possible). Giving false will cause the comment to be scrolled to to appear at the bottom of your screen. Not that the scrolling isn’t perfect; the comment will be half-visible.
It would be useful to be able to remember where we last jumped to, and then jump to that + 1. We can add a global variable for that, and to be reasonably sure it doesn’t clash with an existing variable we’ll give it a name like ‘pkqcbcnll’. If the variable isn’t defined yet, we’ll get an error, so to avoid errors, we’ll use typeof to determine if we need to define the variable or not.
Instagram (and e.g. Amazon and other sites): open main image in new tab
Q: How likely is this to stop working if the site gets re-designed? A: Not too likely to stop working.
When you search for images or look at an author’s images in the grid layout, right-click one of the images and press “open in new tab”, then use the following script to open just the image in a new tab. I.e., it works on pages like this: https://www.instagram.com/p/CSSx_E3pmId/ (random cat picture, no endorsement intended.)
Or on Amazon product pages, you’ll often get a large image overlaid on the page when you hover your cursor over a thumbnail. When you execute this one-liner in that state, you’ll get that image in a new tab for easy saving/copying/sharing. E.g., on this page: https://www.amazon.co.jp/dp/B084H7ZYTT you will get this image in a new tab if you hover over that thumbnail. (Random product on Amazon, no endorsement intended.)
This script works by going through all image tags on the page and finding the source URL of the largest image. As of this writing, I believe this is the highest resolution you can get without guessing keys or reverse-engineering.
xkcd: Add title text underneath image (useful for mouse-less browsing)
Q: How likely is this to stop working if the site gets re-designed? A: May or may not survive site designs.
Useful for mouseless comic reading. There’s just one <img> with title text, so we’ll take the super-simple approach. Alternatively we could for example use #comic > img or we could select the largest image on the page as above.
Instagram: Remove login screen that appears after a while in the search results
To do this, we have to get rid of something layered on top of the page, and then remove the “overflow: hidden;” style attribute on the body tag.
A lot of pages put “overflow: hidden” on the body tags when displaying nag screens, so maybe it’s useful to have this as a separate bookmarklet. Anyway, in the following example we do both at once.
This snippet will present a modal prompt without any restrictions, and put that into the text input element. This example doesn’t work in iframes, and doesn’t check that we’re actually on an input element:
javascript:(function(){ document.activeElement.value = prompt("Please enter value")})()
The following snippet also handles iframes (e.g. on https://www.w3schools.com/tags/tryit.asp?filename=tryhtml_input_test) and should even handle nested iframes (untested). The problem is that the <iframe> element becomes the activeElement when an input element is in an <iframe>. So we’ll loop until we find an activeElement that doesn’t have a contentDocument object. And then blindly assume that we’re on an input element:
javascript:(function(){var el = document.activeElement; while (el.contentDocument) { el = el.contentDocument; } el.activeElement.value = prompt("Please enter value")})()
Removing <iframe>s to get rid of a lot of ads
Many ads on the internet use <iframe> tags. Getting rid of all of these at once may clean up pages quite a bit — but some pages actually use <iframe>s for legitimate purposes.
I.e., songs for which you have clicked the “+” icon. Maybe you want to get a list of your songs so you can move to a different service, or maybe you just want the list. The code presented here isn’t too likely to survive a redesign, but could probably be adjusted if necessary. Some JavaScript knowledge might come in handy if you want to get this script to work.
Amazon Music makes this process rather difficult because the UI unloads and reloads elements dynamically when it thinks you have too many on the page at once.
We are talking about this page (using the default, alphabetically ordered setting), BTW:
Ideally, you would just press Ctrl+A and paste the result into an editor, or select all table cells using, e.g., Ctrl+click.
However, you’ll only get around 15 items in that case. (The previous design let you copy everything at once and was superior in other respects too, IMO.)
Anyway, we’ll use the MutationObserver to get the list. Using the MutationObserver, we’ll get notified when elements are added to the page. Then we just need to scroll all the way down and output the collected list. We may get duplicates, depending on how the page is implemented, but we’ll ignore those for now — we may have duplicates anyway if we have the same song added more than once. So I recommend you get rid of the duplicates yourself, by using e.g. sort/uniq or by loading the list into Excel or LibreOffice Calc or Google Sheets, or whatever you want.
On Amazon Music’s page, the <music-image-rows> elements that are dynamically added to the page contain four <div> elements classed col1, col2, col3, and col4. (This could of course change any time.) These <div>s contain the song name, artist name, album name, and song length, respectively, which is all we want (well, all I want). We’ll just use querySelectorAll on the newly added element to select .col1, .col2, .col3, and .col4 and output the textContent to the console. Occasionally, a parent element pops up that contains all the previous .col* <div> elements. We’ll ignore that by only evaluating selections that have exactly four elements.
Scroll to top of page
Execute code (e.g., by opening console and pasting in the code)
Slowly scroll to the end of the page
Execute observer.disconnect() in the console (otherwise text will keep popping up if you scroll)
Select and copy all text in the console (or use right-click → Export Visible Messages To), paste in an editor or (e.g.) Excel. There are some Find&Replace regular expressions below that you could use to post-process the output.
Note that the first few entries in the list (I think sometimes it’s just the first one, sometimes it’s the first four) are never going to be newly added to the document, so you will have to copy them into your text file yourself.
The code’s output is rather spreadsheet-friendly, tab-deliminated and one line per entry. You can just paste that into your favorite spreadsheet software.
The code cannot really be called a one-liner at this point, but feel free to re-format it and package it as a bookmarklet, if you want.
observer = new MutationObserver(function(mutations) {
     mutations.forEach(function(mutation) {
         if (mutation.type === "childList") {
             if (mutation.target && mutation.addedNodes.length) {
                 var string = "";
                 selector = mutation.target.querySelectorAll(".col1, .col2, .col3, .col4");
                 if (selector.length == 4) {
                     selector.forEach(function(e) { if (e.textContent) string += e.textContent + "\t" });
                     string += "----------\n"
                     console.log(string);
                 }
             }
         }
     });
 });
 observer.observe(document, { childList: true, subtree: true });
Post-processing regular expressions (the “debugger eval code” one may be Firefox-specific):
Find: \n----------\n Replace: \n (Do this until there are no more instances of the "Find" expression)
Find: \t---------- Replace: (leave empty)
There are a lot of duplicates. You can get rid of them either by writing your list to a file and then executing, e.g.: sort -n amazon_music.txt | uniq > amazon_music_uniq.txt Or you can get Excel to do the work for you. Make sure that you have the correct number of lines. (The Amazon Music UI enumerates all entries in the list. You would want the same number of lines in your text file.)
In these dark ages, a lot of software (mostly chat apps) only work on smartphones. While it’s easy to connect a USB-OTG hub to most smartphones (even my dirt-cheap Android smartphone supports this (now three years old)), having two keyboards on your desk can be kind of annoying.
While there are a bunch of possible solutions to this problem, many of these solutions do not fix the problem when you’re not on your home setup. Which is why I often just use QR codes to send URLs to my phone, and there are a lot of QR code generator sites out there.
QR code generator sites are useful because they work everywhere, but many are slow and clunky. Perhaps acceptable in a pinch, but… what if you could just generate QR codes on the terminal?
Well, some cursory googling revealed this library: https://github.com/qpliu/qrencode-go, which doesn’t have any external (non-standard library) dependencies, is short enough to skim over for malicious code, and comes with an easily adapted example. (I am reasonably confident that there is no malicious code at ad8353b4581fa11fc01a50ebf56db3833462fc13.)
Note: I very rarely use Go. Here is what I did to compile this:
$ git clone https://github.com/qpliu/qrencode-go
$ mkdir src
$ mv qrencode/ src/$ cat > qrcodegenerator.go
package main
import (
"bytes"
"os"
"qrencode"
)
func main() {
var buf bytes.Buffer
for i, arg := range os.Args {
if i > 1 {
if err := buf.WriteByte(' '); err != nil {
panic(err)
}
}
if i > 0 {
if _, err := buf.WriteString(arg); err != nil {
panic(err)
}
}
}
grid, err := qrencode.Encode(buf.String(), qrencode.ECLevelQ)
if err != nil {
panic(err)
}
grid.TerminalOutput(os.Stdout)
}
$ GO111MODULE=off GOPATH=$PWD go build qrcodegenerator.go$ ./qrcodegenerator test
// QR CODE IS OUTPUT HERE
Note: the above code is adapted from example code in the README.md file and is therefore LGPL3.
Update 2026-02-05: GO111MODULE=off is required for recent versions of Go.
Since Go binaries are static (that’s what I’ve heard at least), you can then move the executable anywhere you like (e.g. ~/bin) and generate QR codes anywhere. Note that they’re pretty huge, i.e. for ‘https://blog.qiqitori.com’ (26 bytes) the QR code’s width will be 62 characters. For e.g. ‘https://blog.qiqitori.com/2020/10/outputting-qr-codes-on-the-terminal/’ (this post) the width is 86 characters.


