The laptop I’m still typing this on recently developed a loose contact in the AC adapter’s cable. The laptop I’m currently using was also bought used in Akihabara in 2013, for only about 8000 JPY. However, it was lacking a wireless card, had only 1 GB of memory, and had an 80 GB harddisk in it. Well, I put in the SSD and memory and wireless card from my old broken laptop, and performance-wise had myself something very close to that old laptop. Except instead of a Core2 Duo P7350 CPU, I now had a T7250. So that’s a tiny performance decrease. (This link has benchmarks for both CPUs: http://cpubenchmark.net/midlow_range_cpus.html)
Annoyed about the AC adapter, I decided to head to Akihabara to find a new (well, or used) one. HP part 384021-001. But since this laptop is kind of old and slow and only supports up to 4 GB of memory, I also headed to Yodobashi Camera to look at new laptops first. I thought the HP Spectre looked quite nice on HP’s website. But the real thing looks a bit flimsy and only seems to come with Thunderbolt ports. Wow, they still sell laptops with 2 GB of memory. They still sell laptops that only support up to 4 GB of memory. They still sell laptops with harddrives! And they’re still like 50,000+ JPY (currently 480 USD). The good ones are all 100,000+ JPY (961 USD). Boo, let’s get out of here.
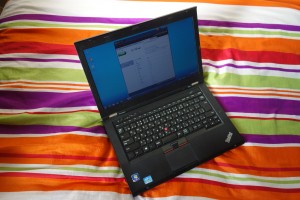
And I found my AC adapter, for only 1500 JPY! Great, but the guys at the store wouldn’t let me test it right there… Lame, so half-thinking they’d let me after all if I told them that would be a bit risky for me and walked out (they didn’t), I decided to check out other shops, and found one that wanted about 2500 JPY. Hrm. And thus I decided to just go ahead and buy a new used laptop. I’d already sort of looked for bargains while looking for the AC adapter, and found something really good: A 2012 Lenovo ThinkPad (T430S), with an i5-3320M (4013 points vs. 1120 points on the T7250 as per http://cpubenchmark.net/mid_range_cpus.html), 8 GB of memory (upgradable to 16 GB), a 240 GB SSD, and Windows 7 Professional. Price: about 35000 JPY (336 USD). Also, the shop had a dozen of these laptops or more. The shopkeeper asked me if there’s anything I’m especially interested in given all this choice. Well, I just said I’d like a decent battery, and then the shopkeeper looked for a laptop with a clean keyboard, and tried various batteries to see which one had a good remaining capacity. Well, he found me one that had almost 100% remaining.
So how do these specs compare to a new laptop these days? Let’s take the MacBook Pro (“Early 2015”) that I had been using at my previous workplace. Note that this is still the newest MacBook Pro available. Apple hasn’t updated this line yet. The one I was using was purchased new in around October 2015 for I’d assume about 172,800 JPY. That’s the current price for a similar model anyway. Compared to the one I bought used, that’s the same amount of memory, an i5-5257U with a score of 4339 on http://cpubenchmark.net/high_end_cpus.html (i.e. 8% faster than my new 4-year-old laptop), and a similarly sized SSD. Now, the MacBook is lighter, has a really nice touchpad and a very nice retina display, probably higher-grade memory, and the SSD appears to be plugged into PCIe, but is that really worth 4.94 times the price? Not in my opinion. (Note: you can buy used MacBooks, but they’re still around 100,000+ JPY.)
So looking for a used laptop and care about price, condition, and battery performance? I’d say Akihabara is a good place to go.