Summary: Segmentation tool and OCR verification tool. You can use these tools to either verify an existing OCR’d hex dump, or use them to run your own OCR. (Which isn’t hard! You can probably get ChatGPT to produce a probably working Python script using PyTorch to learn the digits, and easily get 97% (or so) accuracy. Maybe something along the lines of, “Write a Python script that uses PyTorch to train recognition of something like MNIST, except there are 16 classes, not 10. The recognition should use convolutional layers. Input images are PNG files. Labels are in a text file.” (I just tried and the result looks plausible.))
Why hex dumps anyway? Because in the 1980s computer magazines sometimes included printed hex dumps of programs. But that’s just how I got motivated to write these tools. More on that in this post.
If you are familiar with basic image recognition concepts, you may know that detecting hand-written digits is generally considered to be a very easy task, the “hello world” of AI image recognition even. (Didn’t know this? Maybe search for “MNIST dataset”)
If recognizing handwritten digits is considered so easy, recognizing printed digits should be even easier, no? The answer is “yes” and “no”, because I left out some information above. The MNIST dataset consists of images that contain exactly one digit. OCR, on the other hand, requires segmentation. In general, recognizing typed letters if you have them in a nicely cropped single image is quite easy. (Except for letters that look very similar or even identical, of course.) Is segmentation an easy task? Well, there are all kinds of layouts out there. If you want to know more about segmentation, Andrew Ng explained the basics in this and the following few videos: https://www.youtube.com/watch?v=CykIW9hFK24&list=PLLssT5z_DsK-h9vYZkQkYNWcItqhlRJLN&index=108. These videos are part of Andrew Ng’s Machine Learning course on coursera.org, but I can’t find the specific lecture that contained this bit. (tl;dr: basically, you have a pipeline with multiple stages: first you detect regions that vaguely look like text, then a stage that detects if you have a single character or more than one character, and finally a stage that can recognize single characters.)
Performing segmentation on hex dumps and other monospace text is quite easy. However, getting the segmentation wrong can ruin the OCR. Either hardly anything will be recognized, or things will be jumbled up. I played around with Tesseract and a couple other OCR systems but wasn’t able to get good results on hex dumps. Hex dumps have the additional benefit that there are only 16 symbols that need to be recognized. One tool that work pretty well was ProgramListOCR (https://github.com/eighttails/ProgramListOCR). I think it was over 95% accurate with my input images. If it could output the segmentation too, it would be even better, in my opinion.
In this blog post I’m going to describe the tools I linked to above (Segmentation tool and OCR verification tool) and how we can use these tools to get a perfect OCR scan of a hex dump. Because let’s face it… A 99% correct hex dump isn’t all that useful, unless you enjoy sending old CPUs off the rails, or playing spot the difference.
Text segmentation/image tiling tool
The segmentation tools sort of looks like this (at the time of this writing):
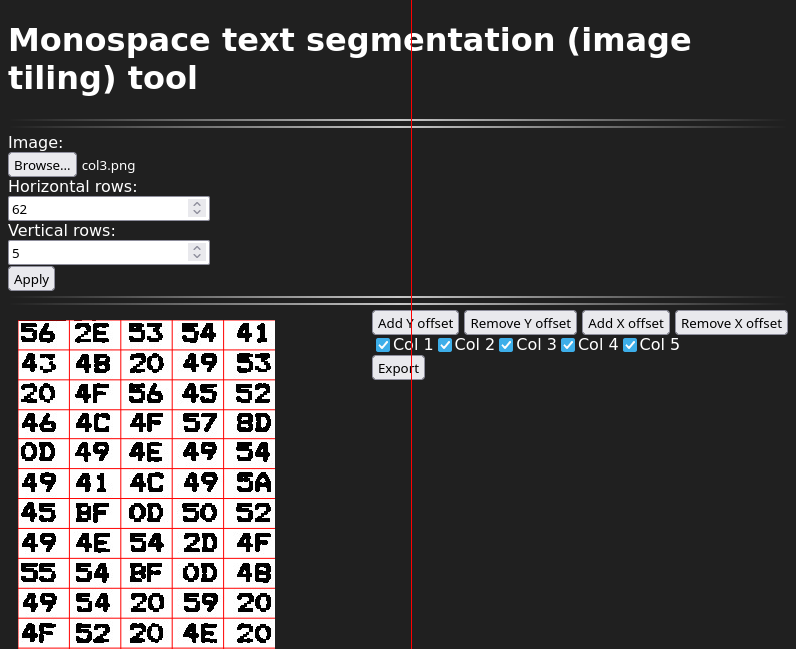

What you can do here is: select an image from a file, specify the number of columns and rows, adjust the rows and columns using the buttons on the right (and then clicking somewhere in the image to that row or column smaller or larger), export to tiles. The adjustment process is best done at high zoom levels (use Ctrl+scroll wheel to zoom). You can also choose to skip certain columns when exporting. You can use the keyboard to do most things. (Cursor keys: move around, space: use current tool at cursor position, T: toggle column export tool, x/X: add/remove X offset tool, y/Y: add/remove Y offset tool.) The tiles will be output into data URLs in the text area at the bottom of the page. You can convert the data URLs back into files using the given shell code snippet. Also reproduced here:
# put contents of clipboard into a file:
xclip -o > data.txt

# convert data URLs in data.txt to PNG files:
i=0; while read -r line; do output_file=$(printf "%05d.png" $i); echo "${line:22}" | base64 -d > "$output_file"; i=$((i+1)); done < data.txt
You can of course also tile into single characters. You’ll just have to fiddle a little more with the offset tools.
OCR verification tool
Here are two screenshots that may help to get some intuition on how to use this tool:


This tool (at the time of this writing) expects as input 1) images as data URLs, to be pasted into the textarea at the top of the page, and 2) the predicted labels corresponding to each image.
The tool then displays the input images sorted into their classes for easy verification by a human. ;) And this is pretty easy for humans, because there are just 16 classes and the human eye is very sensitive to objects that don’t look like the surrounding objects. Here’s another screenshot to demonstrate that it should be easy to find things that look out of place:
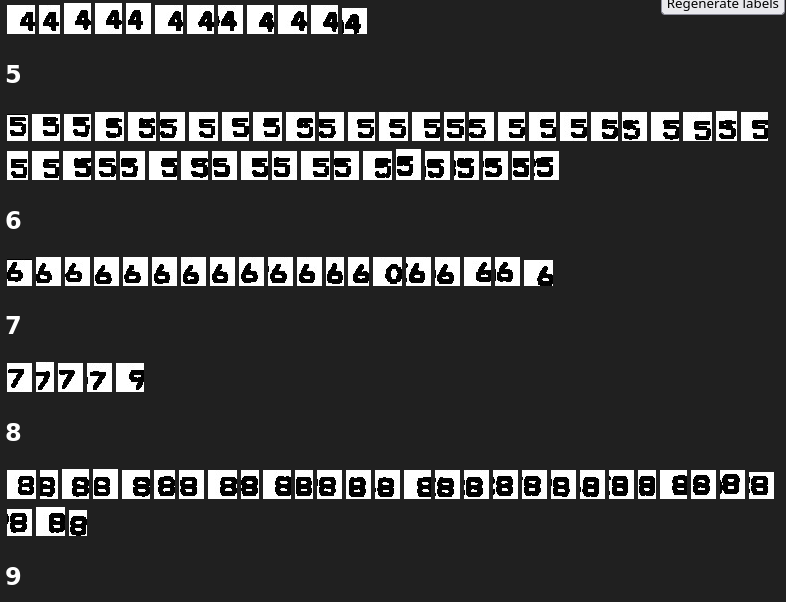
The web page allows you to drag the images around to put them in the correct category, and to then reconstruct the labels, taking the fixes into account.
Here’s a more real-world example, with unpolished input images. (If you invest a couple minutes to add/remove offsets in the segmentation tool, you should get slightly better images than this.)
